Symfony Webpack encore going from global variables to webpack js management and node packages

Going from a JS strewn over the project to a single app.js and app.css that will hold all the dependencies and webpack which is going to manage this in an efficient manner.

Modules in JS – importing, exporting. Why is it a first step to managing node_module as in PHP’s composer

module.js

module.exports = function() {
   return 'A message from a module which returns a function, but can return an object or a string typically';
}

When importing the module in a different .js file:

const importedModule = require("./module.js");

The dot slash in require is important as it means that we’re improting the js file. If we skipped that it would have meant we’re trying to import a third party module.

One more thing, the “.js” part can be omitted. JavaScript knows here what we mean and it’s going to import the js file even if we don’t provide this extension in require function.

const importedModule = require("./module");

Now, our module.js can be modified and it’s syntax refactored. Instead of modules.exports

module.js

export default function() {
   return 'A message from a module which returns a function, but can return an object or a string typically';
}

With default the module (file) can export something more that one function but most of the times you will want to export just one thing. In the file that uses the module this now can be expressed like that:

import importedModule from './module';

importedModule – this is an arbitrary name

./module or ./module.js – still the same file that we’re importing from

If the import source is without folder references, just with a name:

import importedModule from 'module';

the library would be looked for in “node_modules” directory.

Which code from the package is then imported, which file?

in package.json for every packaged the there is a object’s key called “main” which specifies which file should be imported, for jQuery it is “dist/jquery.js”.

Now if we wanted to import jquery from node_modules we’d do it like that:

import $ from 'jquery';

A webpack contruct we could use here if we needed the global variables (old school):

global.$ = $;

since we already imported ‘jquery‘ library to a variable called $ then we can now use in the assignment above (the global.$ is a webpack feature)

Why bootstrap functions don’t work with jQuery even though it is included via script tag?

When you include bootstrap js code via <script> tag it expects that a global variable “$” is set.

How do I know what’s the name of the package in yarn?

Go to https://yarnpkg.com/en/packages?q=bootstrap&p=1 and have a look there.

add the package via yarn with: yarn add bootstrap@4.1.3

Now we can add in app.js:

Let’s import bootstrap node package to the project

import ‘bootstrap’; (since this is a jQuery plugin) and jQuery plugins are not standard because there DO NOT return value. Instead they modify jQuery and add functions to it.

Now, bootstrap.js depends on popper.js and jQuery.

  • jQuery is already there in node_modules
  • popper.js is not, therefore webpack build was failing.

Not in all cases will the dependency of one node packge be automatically resolved. It’s called a “peer dependency”.

We can now add popper.js with:

yarn add popper.js –dev

Now webpack is optimizing our build with “code splitting”. When it discovers it’s more efficienty to split the code to app and vendor part you will have:

  • app.js
  • vendor~app.js (which can be cached then more efficiently as it doesn’t change that often as app specific code)

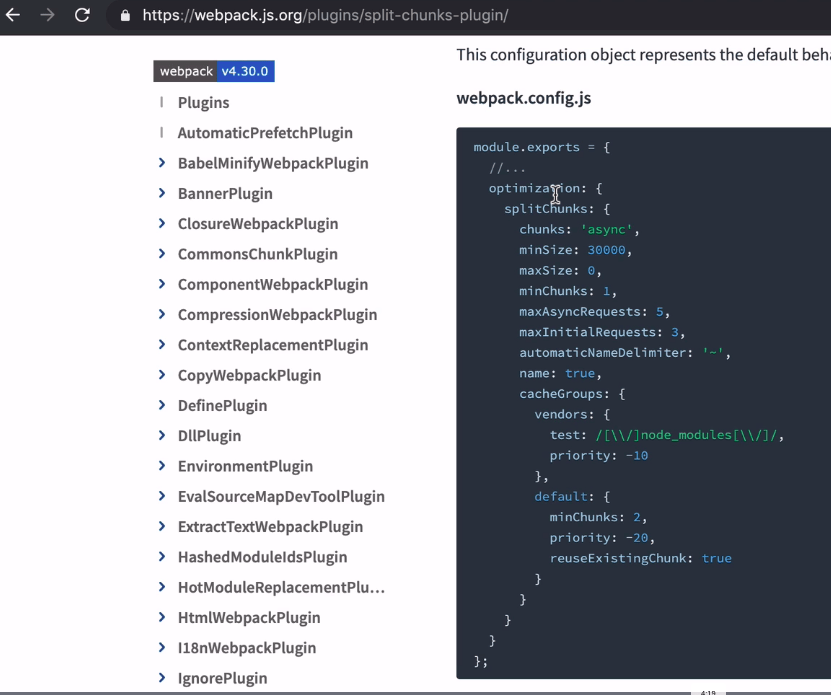
Webpack’s algorithm determines whether to spli the js code depending on the size of the package. (this comes from a webpack plugin “splits chunks plugin“.

The plugin has a default config, which we can modify in Symfony Webpack Encore.

at the end of webpack.config.js (which is a config from a Symfony Webpack Encore) there is a line that generates the original’s webpack config:

module.exports = Encore.getWebpackConfig();

If we wanted to modify the setting of the plugin we could do it like that:

const config = Encore.getWebpackConfig();
config.optimization.slitChunks.minSize = 2000;
module.exports = config;

Or this could be done with .configureSplitChunks using Encore’s config.

webpack.config.js

Encore.
    // ...
    .splitEntryChunks()
    .configureSplitChunks(function(splitChunks) {
        splitChunks.minSize = 20000;
    })
    // ...
;

module.exports = Encore.getWebpackConfig();

Importing css files with webpack

It’s best to:

  • import one .css file in the .js file that’s under webpack’s control

Importing other css files from node_modules

In app.css (main file which imports other files) the method to import other files we can you import statement, just like that:

@import ‘~/bootstrap/dist/css/bootstrap.css’

which can be shortened to

@import ‘~bootstrap’

thanks to a feature added to Symfony Webpack Encore which imports either style, main or scss files depending where we’re importing it. Since we’re here in app.css then style.css is used.

Note: only some packages enable these keys like “style”, “sass”, “main”. Bootstrap does.

The difference with importing node js modules here is the:

  • @ symbol at the beginning
  • ~/ – this just means we’re looking in node_modules
  • bootstrap – actual name of the node package
  • /dist/css/bootstrap.css – the path to the css file we’re importing to the project

whereas for node JavaScript module it was just

import someReturnObjOrFunOrString from ‘bootstrap’;

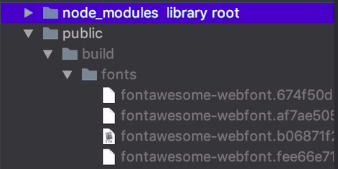
Webpack importing a package and automatically imported fonts

When we import a package from node_packages like @import ‘~font-awesome’ we then, can observe that in the background, the fonts are imported separately into public/build/fonts. Also adds hash to the name of the files, based on the files’ contents – which is used for browser cache busting.

public/build/ – the path that we specified in webpack.config.js with setOutputPath.

What packages do real symfony projects use?

What do we have here:

Note that I am not commenting on all the packages – only these that I have not seen yet.

Autostart and keep your processes running on fail in Ubuntu 18.04 with supervisord

Just need to go through these articles:

  1. https://www.digitalocean.com/community/tutorials/how-to-install-and-manage-supervisor-on-ubuntu-and-debian-vps

Digitalocean has the greatest content!!

2. Here on more config options: https://stackoverflow.com/questions/27291448/supervisor-config-user-option-in-program-section

I wanted to run the script as a specific user, so in this case you just add to the /etc/supervisor/conf.d/<specific_file>.conf that has the supervisord options like:

  • which command to run (a consumer sending emails)
  • as which user (I want to run it as www-data)
  • whether it should start when the system boots up (autostart)
  • whether it should restart automatically (autorestart)

An example supervisor config:

[program:send_email_consumer]
command=php /var/www/examprep/bin/console rabbitmq:consumer send_email_consumer
autostart=true
autorestart=true
stderr_logfile=/var/log/send_email_consumer.err.log
stdout_logfile=/var/log/send_email_consumer.out.log
user=www-data

RabbitMQ – queue empty after a restart, why even though it’s “durable”?

State before:

  • A message in the ‘send-email-queue’

and now restarting the server and the queue is cleared. Message is gone? Why?

You can see that there are two options for a message in “Delivery mode” when publishing the message from the rabbitmq panel – in a “queue” tab you will find this:

This is the panel site, so nothing to do with your producer in the code which should have the proper “delivery mode” when producing the message. So in the class of your producer you should set delivery mode to “2” which is “persistent”.

You can do that using php-amqplib/rabbitmq-bundle by extending your producer class with OldSound\RabbitMqBundle\RabbitMq\Producer which, itself extends BaseAmqp.

Once you’ve extended your producer class with OldSound\RabbitMqBundle\RabbitMq\Producer it’s already by default setting the “persistent” delivery mode and you will see in the panel instead of this messages “In memory”:

you will see it stored both in “Persistent” and “In memory”

Now even after a restart the messages are still int the queue, ready to be consumed.

Sample Producer:

<?php

namespace App\Producer;

use Exception;
use OldSound\RabbitMqBundle\RabbitMq\Producer;
use PhpAmqpLib\Connection\AMQPStreamConnection;
use PhpAmqpLib\Message\AMQPMessage;

class SendEmailProducer extends Producer
{
    /**
     * @var AMQPStreamConnection
     */
    private $rabbitConn;

    /**
     * SendEmailProducer constructor.
     * @param AMQPStreamConnection $rabbitConn
     */
    public function __construct(AMQPStreamConnection $rabbitConn)
    {
        parent::__construct($rabbitConn);
        $this->rabbitConn = $rabbitConn;
    }

    /**
     * @param string $msgBody (data for email)
     * @param string $routingKey
     * @param array $additionalProperties
     * @param array|null $headers
     * @throws Exception
     */
    public function publishUsingUserPrivacyChanges(string $msgBody, $routingKey = '', $additionalProperties = [], array $headers = null)
    {
        $channel = $this->rabbitConn->channel();

        //TODO: remove the key, and make the exchange a fanout!!!
        $channel->basic_publish(
                new AMQPMessage($msgBody, array_merge($this->getBasicProperties(), $additionalProperties)),
                'send-email-exchange',    //exchange
                $routingKey    //routing-key
            );

        $channel->close();
        $this->rabbitConn->close();
    }
}

Stripe Connect – building a platform

Stripe Connect Introduction

Stripe Connect enables anyone to start up their online business using “marketplace” business model. That is a model where there is a platform that attracts two or more groups invoved as well in one purchase. Think Airbnb, Uber, eBay or Amazon. Why two or more? Because in case of Uber for instance, you can split the fare among more passengers.

A dashboard for vendors

Going straight into it – integrating with our website

https://stripe.com/docs/connect/standard-accounts#integrating-oauth

Charging

You can choose the way you create charges (https://stripe.com/docs/connect/charges#choosing-approach). It depends, whether platform is involved in the transaction (Lyft, Airbnb) or not (Shopify or Squarespace). Another factor is whether all the sides of transaction are known at the time of charge or not, whether the transfer is done at the time of charge. You can combine the approaches. Here they are:

  • direct
  • destination
  • separate charges and transfers

Destination charges

https://stripe.com/docs/connect/destination-charges

Flow of Funds

This is straight from Stripe’s docs. It’s pretty self explanatory.

Pricing

https://stripe.com/connect/pricing

Glossary

Platform – think Uber, Airbnb, eBay – generally the middle man that hosts the web app and manages the “connected accounts” (see “Connected account“)

Connected account (also “account”) – created usually when a vistor of the platform’s website signs up, used verify the identity of the user and manage the flow of funds from/to the visitor. It is an account that has a unique “id” and it is hosted by Stripe. There are three types of accounts: “Standard, Express, Custom“.

Links to resources concerning Stripe Connect and marketplace sales process

About Stripe Connect

https://stripe.com/docs/connect/accounts – types of accounts that can be created via Stripe

https://stripe.com/docs/connect/charges – create charges using Stripe API. That’s

https://wedevs.com/docs/dokan/modules/how-to-install-and-configure-dokan-stripe-connect/ – an instruction on how to integrate Dokan with Stripe Connect – very visual with a lot of screenshots

https://apiko.com/blog/how-to-integrate-stripe-connect-with-your-marketplace-for-c-c-payments/#6Stripe Connect workflow explained from different POVs

https://stripe.com/docs/connect/destination-chargesthis explains the flow of funds

https://www.indiehackers.com/post/i-work-on-stripe-connect-ask-me-anything-7770395579AMA with a PM of Stipe Connect on Indie Hacker’s – you can hit him up on twitter

Dev Libraries for Stripe Connect

https://github.com/tipsi/tipsi-stripeReact Native library

Taxes and Stripe Connect

https://stripe.com/docs/orders/tax-integration (DEPRECATED API that would apply sales tax or VAT automatically – but shedding light on the problem)

https://www.sharetribe.com/community/t/vat-on-transaction-fee/1808/3 – maybe you can get something out of there

https://paddle.com/ – this service provides sales tax calculation service and “You are indemnified from all your sales tax

Taxes in general

https://www.gov.uk/guidance/the-vat-rules-if-you-supply-digital-services-to-private-consumers#businesses-established-outside-the-euVAT MOSS and selling digital goods to the EU and outside of the UE

Testing Stripe

https://stripe.com/docs/connect/testing – you can use Stripe before establishing a business first – in a test mode. I’d recommend that you first talk to accountant though.

Invoices and receipts

https://stripe.com/docs/recipes/sending-custom-email-receiptshow to send custom receipts

https://stripe.com/docs/billing/invoices/workflowinvoicing’s workflow

Design a site like this with WordPress.com
Get started